Apple Invites app is an easy way to bring an event invitation together directly from your iPhone or web browser. The app can be downloaded free of charge from the App Store. Technically speaking, you don’t even need an iPhone or an Apple account for RSVP for an event.
If you want to create your own invitations, you have to be one iCloud+ Subscribe, but the entry barrier is relatively low. The subscription is more bundled in Apple’s more expensive Apple one Plans (the bundle that contains things like Apple TV+, Apple Music and Apple News+), and you can also pay it separately at 0.99 per month. ICloud+ subscriptions receive an additional cloud memory, a custom domain for your iCloud email and the private relay function of Apple in addition to your new authorizations for creating invitations.
What does Apple invite?
Apple Invitation is Apple’s attempt to create an event planning and invitation how to create the service like Part or Avoid. With the app you can create events and create RSVP and contain integrations into other Apple services such as collaborative playlists from Apple Music and jointly used albums from Apple Photos. Invitations also support Image Playground if you want to use AI to create an image for your invitation instead of relying on the integrated options of Apple or one of your own photos.
How to create an event charging with Apple invitations
To create an event invitation with Apple invitations iCloud website Or do you have an iPhone with the age of 18 with iOS with The inviting app is installed. To use the integration of Apple Intelligence, you also need an iPhone that supports the function (an iPhone 15 Pro and Up).
To create your event, first open the Apple app. Then tap “Create an event” when you open the app or the small “+” in the upper right corner of your screen for the first time when you already have events that you have created or to which you have been invited. You should then see an empty invitation screen.
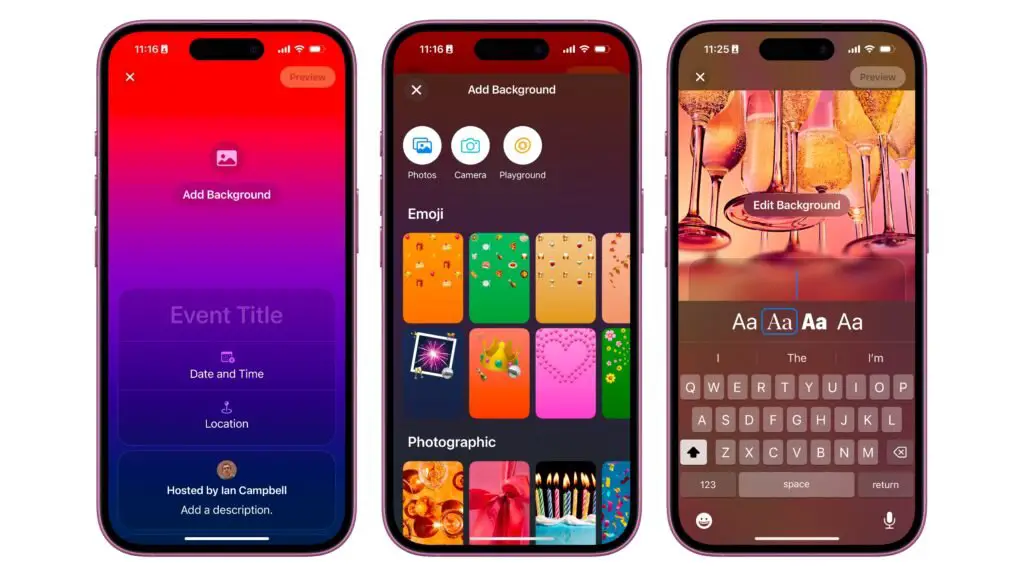
From here, tap “Add background” and select from the prefabricated background of Apple (emoji, photography and color options) or a new photo, a picture from your photo library or an image playground creation by on one of the circular Symbols when typing the top of the screen.
Next, you would like to specify your event by tapping “event title” and entering everything you want to call it. With Apple you can also select from four different font options to add an additional style. Tap on “Date and Time” to select the day and the time that the event begins and ends, and then at “Speicherort” to look for the place where you host your event. You can also give the place a name if you want. By tapping “a description” you can add an event description with additional information and enter a separate host name if you prefer the invitation not to display your first and last name.
These are the basics you have to fill out for an invitation. However, invitations include two other functions that are specific for Apple software. If you tap on “Create album”, you can create a shared photo album to which guests can access during the event. The name of the album will be the name of the event, but you can enter a new name under the album name and in “Done” if you want to save your changes.
You can also tap on “Add Playlist” to create a shared playback list, to which the guests can add songs before and during the event. You have to select an existing play list or create a new one from scratch. If you create a playlist, the name of your event is processed by default with the option if you want.
As soon as you have made your invitation to see what it looks like for guests, tap “Preview” in the upper right corner and then “continue” to invite the guests.
How to invite guests to an Apple that invites event
As soon as your event is invited, you can send it to your guests in a few different ways. You can send the invitation as a public link or invite individuals from your contact list. In your invitation, tap the guests to send their invitation.
If you tap the messages or e -mail symbols, you can send a link to your invitation via these respective apps. If you tap on “Link” Share -Link “, you can share a link to the invitation via each app in your iOS Share leaf. And if you tap on” Copy link “, your invitation link will be copied into your clipboard so that you will be copied so that you can can insert everywhere.
You can also send a one -time link to individual guests by tapping “Select a guest”. Apple invitations are asked to access your contacts and then display any contact that you have saved. Tap on you to share a clear invitation link via messages, mail or the iOS Share leaf. In contrast to public links, these links can only be used once.
How to send a note to guests of an Apple invitation event
If you want to update your guests about your event or remember something that you may have to bring with you, you can send an Appites app to anyone who has invited a note directly via the Appites app. In your invitation, tap “Send a message” and then enter the text you want to send and tap on “Send note”.
How to delete an Apple invitation event
If you have to cancel your event, you can delete it by tapping the event and then tapping the three-point menu in the upper right corner. Tap on “Event settings”, then scroll down and tap on “Delete event”. Confirm that you want to delete the event by tapping on “Delete event”.
This article was originally on Engadget at https://www.engadget.com/apps/how-to-use-vites-to-plan-your-next-204503849.html?src=rSS
Source link