We can earn a commission from left on this page.
If you own A Lectic Xpeak 2.0 e-bikeIt is possible to change a lot of aspects of the bicycle directly from the onboard screen, including the change in the top speed, the setting of the gas and pedal assistant, control of the lights and much more. However, these settings are not easy to understand from the display alone. Here you will find a step-by-step instructions on how to change the settings on a Lectric E bike, as well as some suggestions about which settings you should change and which you definitely should not.
((You can check my assessment of the Lectric Xpeak 2.0 here.))
How to set the settings on a Lectical Xpeak 2.0 e-bike
Here you can find out how to access the Settings of a Lectric Xpeak 2.0 e-bike menu:

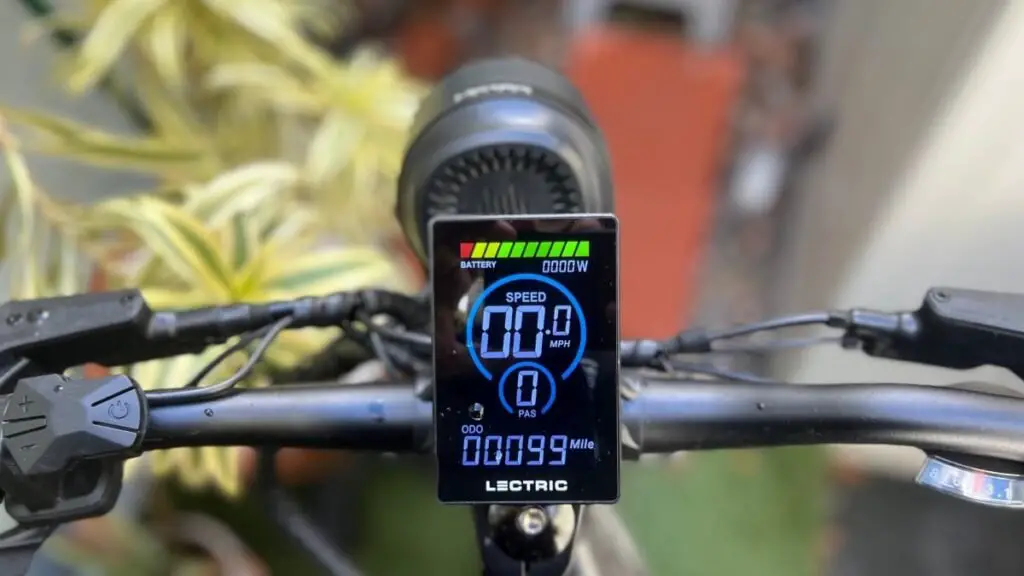
Credit: Stephen Johnson
What do the different settings do on a LECHTIC E-BIKE?
If you have entered the Settings of your Lectic Xpeak 2.0 menu, you can find that the settings are referred to with P-1 via P-22 without other information available on the screen. This is not much to do, so here is what the settings do. (You will find that I skip some settings – I will go through it in a different section below.)
-
P1: If the brightness of the display screen changes. There are three settings. “1” is darkest. “3” is the lightest. Standard is 2.
-
P2: Change between miles and kilometers. “0” is kilometer. “1” is miles.
-
P4: Sleep Timer: Change how long it takes for the bicycle to not be used if it is not used. The default setting is 10 minutes, but you change it from “0” (which means that it never switches off automatically) to 60 minutes.
-
P6: tire size: You can change this from 27 to 31. This is used to calculate the distance and speed and should not be changed, unless you have changed the tire size from the standard 29.2.
-
P8: Speed limitation: This sets the top speed of the bicycle. 32 is a “class 2”, ie the top speed is 20 miles per hour. 45 is “class 3”, which increases the speed limit to 28 miles per hour if it uses pedal assist. The default setting is 32 or 20 miles per hour, so you have to change this if you want to go faster.
-
P9: Throttle Active Toggle: If you set this to 0, the gas can be used by still breasts. Adjusting to 1 means that the gas remained can only be used if the bike moves.
-
P10: Throssing flap/pedal assistant system switching: Here are three settings: “0” means that the pedal assistant is active, but it does not gas. “1” means that only the gas is active, without pedal assistant. “2” means that both PAS and gas are active. The default setting is 2 that most users want to use most of the time, but there are cases in which it makes sense to change it (see below).
-
P11: Multiplier switch: This changes the torque of your bike. “0” is the standard multiplier of the normal torque. “1” is an increased torque multiplier. If you want faster acceleration, set this to “1”, but only change it when you know the bike pretty well – the standard multiplier offers a lot of torque. I tested this and didn’t notice a lot of difference anyway.
-
P12: Light control: “0” means “no light symbol on the display means that the front and rear lights are switched off. When the light symbol is switched on, the front and rear lights are switched on.” Change this in “1” means “the front and taillights flash immediately when the bike is switched on. The symbol on the display for light flashes at the same speed as front and rear light.” If you turn on the light when adjusting, you will see a symbol on the display screen without flashing.
-
P13: Walk mode speed: “0” sets the speed of the walk mode to 3 miles per hour. “1” is a slightly striving 3.7 miles per hour.
-
P16: Reset mileage: Keep the “+” for 5 seconds to reset the mileage to “0”.
-
P20: Walk mode Toggle: Put this on “0” deactivates the walk mode. The determination of this to “1” enables it. (To switch on the walk mode, keep the “-” button pressed on the controller. If this is activated, your bike will move forward with the speed you have set to P13.)
-
P22: Auxiliary level: “0” limits the pedal aid to 9 miles per hour if you are on Pedal Assist level 1 and 15 miles per hour if you are on pedal assistant level. “1” means that the pedal assistant is not quickly limited to the pedal assistant level 1 and 2, but the gas is limited. “2” means that the pedal assistant or gas does not give a speed rim, regardless of the pedal assist level at which they are at.
What settings should you change on an Xpeak 2.0?
The setting with which most users deal with is P8, the speed limit of the bicycle. The default setting is a speed limit of 20 miles per hour that you can either reach with pedal assist or throttle valve, but you want to increase it to 28 (provided that an e-bike in class 3 is legal in your region and you are enough to do the additional speed). This setting means that the throttle valve aids with a pedal assistance. There is no setting to use a throttle valve to walk over 20 miles per hour.
Another setting that you should take into account is P9, the interrogating switch. The default setting means that the gas lever can be activated from a standstill. However, you may want to change it so that the gas can only work if the bike is in motion. If you accidentally hit a lot of thumb, especially when you run by bike, this prevents your bike from “jumping forward”.
P10 is another useful attitude for some situations. In some places it is not legal to drive a “class 2” e-bike, which means that a throttle flap check has. This setting deactivates the gas levers, but enables the pedal assistant and transforms your class 2 bike into a class 1.
What about the rest of the settings?
The Lectric Xpeak 2.0 has 22 settings that can be changed from the dashboard, but only 13 are listed at the top. I looked at it, and the nine “secret” settings on Lektrikbikes are less exciting than I had hoped. They are mainly settings that enable different models of bicycles to use the same computer so that you change things like the voltage level of the battery and the magnett type. Do not change these settings. As far as I can judge this, there is nothing that was obtained from it. If you accidentally change them somehow and do not know the right setting, only ride a bike until you have spoken to someone at Lectric who can help you restore the right values.
“I messed up the settings on my Lectric Xpeak 2.0! How can I fix that?”
Unfortunately there is no “return to the factory standard setting” on the Lectric controller. To make your e-bike again as it was, you can use The manual To display the standard number for each setting, or contact the company to receive additional help.