We can earn a commission from left on this page.
Over the years I have accumulated dozens of make -up brushes, which means that I have spent far too much time cleaning them. Dirty brushes can screw up their glamor, but also cause outbursts and distribute bacteria and everything else that otherwise lurks in your make -up bag on your skin. In the worst case, you can even get an infection. It is important to clean them regularly – seven to ten days each – but also does it right. Some cleaning methods are ineffective and others for the brush. Here you will find what you should know not only about cleaning your brushes, but also about your sponges.
How I clean my make -up brush
There are many tutorials in all of Tikok, YouTube and Instagram that show how influencers and make -up gurus clean their brushes, but many of them are full of poor information. For example, the use of oil is no-no; It is extremely difficult to remove bristles, which can make the brushes less effective and cause outbreaks on certain skin types. I also saw many videos in which users fully immerse their brush heads into soap water. No again: after all, that can also damage the glue. I am lucky enough to be friends with a real professional makeup artist and model. Rachel DefluriAnd for years I have followed your advice instead of tips from self-proclaimed online gurus.
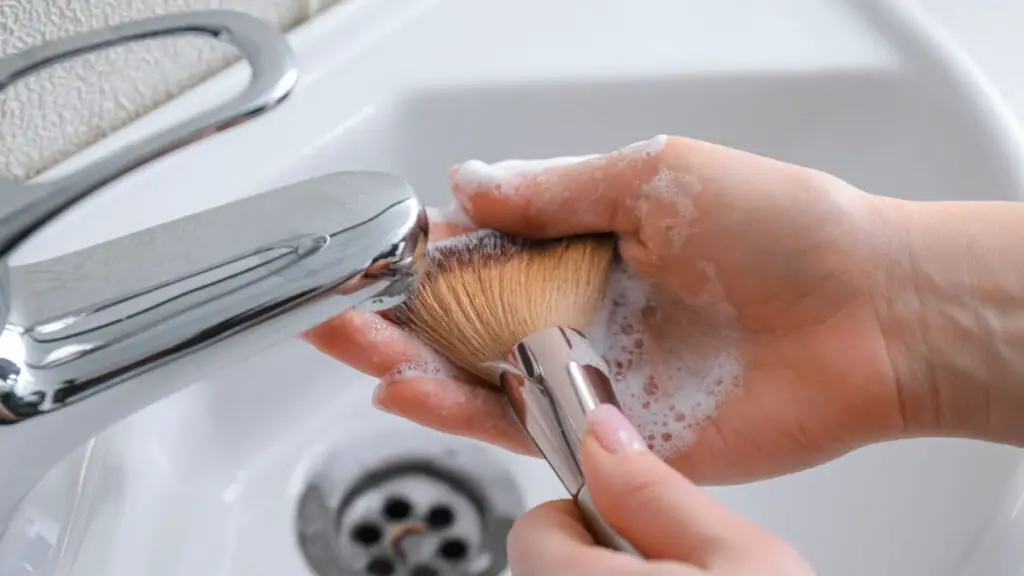
First I start with a simple rinsing to switch off the most obvious and external make -up, fill a small bowl with micellar water and to have every brush around there. Since Defluri told me that I should use Micellar Water to clean make -up brush, I loved it because, just as it somehow removes make -up from your skin, it does the same here -it does the same here – here –very Gentle and simple. If you don’t have any, just carry out your brush tips under a tap. The regular water will take a little longer, but the powder and liquids on the outer parts of the brush will expire at some point so that you can handle the trains that are really deep inside.
Defluri adds that micellar water can be used if you are in a hurry and have no time for other steps: “Simply suck in a cotton block or a towel with micellar water and wipe your brushes clean it is a great option for spot cleaning between depths Laws. “She also points out that if you are in a hurry And If you are sure that your brushes are made of synthetic fibers, you can carry out this technology with 70% isopropyl alcohol by applying it to a pad or rag and gently let it run over the brush head. She warns that it “breaks stubborn products and kills bacteria on the contact” and is ideal for disinfection, “it can dry over time, so use it economical.”

Only whirl the tips so that the glue in the brush does not get wet. In the end, your micellar water should look dirty, like the picture on the right.
Credit: Lindsey Ellefson
If you are not in a hurry and want to do a complete depth, go to the next step. I fill up the same bowl with simple, clean water and add a few drops of gentle jet soap (even though you can also use baby shampoo). Avoid something else like the hand soap. Some bloggers have also recommended pigeon bodies in the past, but this contains some conditioning agents that their bristles can coincide with a film over time. Our goal here is to withdraw everything from the bristles and not add anything to them, so the soap of the simple dish is the best choice. The gentler and clearer, the better. According to Defluri, it also works whether you clean synthetic or natural bristles so that you do not have to play installment games. Whisk your brush tips back in and massage them with your hands this time to “scrub” them. Every time the water gets too dirty, throw it and fill up the bowl. Finally, every brush stops publishing powder and liquids, and when they run back under the tap, the water that comes from them becomes clear.
Many influencers recommend using a bumpy silicone mat as a scrubber during the cleaning process, but these are special products that are not really necessary. They are comfortable, yes, but represent the spectrum of the costs ($ 5 for easy at UltaPresent $ 37 for the big one on Amazon) and not much more than a good massage with your fingers. Their biggest advantage is that you get a lot of water out of your brushes through running your brushes, but you can do it yourself by gently pressing the bristles over your cleaning bowl or sink. My little hack is that I use my Silicon Dish Ponge that I Swarm for general cleaningAnd it works just as well as the special mats I tried and I can use it for my dishes and cleaning the kitchen. The best of all is that this multi -purpose miracle comes in A two -pack for only $ 9.

Massage the product from each brush with a mat or by hand and carefully lay it out to dry.
Credit: Lindsey Ellefson
If the water is completely clear through it, it is time to dry your brushes completely. Place it flat on a paper towel or a microfiber cloth. (I recommend the cloth because you actually need about seven paper towels that are stacked to catch the whole water that comes out over time because they dry and then be difficult to use. Instead, they shape the bristles carefully Again in the form that they were and let them dry. do they do not Dry them up in a container; This affects the glue on the bristle because the water falls. You can even dry them as they hang upside down, but I don’t have the space or the necessary mechanics. If you find a way to attach a number of handles so that the brushes are in the air, let me know. The drying of flat is perfectly fine, but it is a clever movement to turn it regularly so that the bristles are not flattened on one side.
How to clean a make -up sponge
Make -up sponges that were still a popularity boom in most make -up kits are much easier to clean than brushes because they can completely immerse them in water without any problem. You can first do it in micellar water and then switch to your soap-water mixture or simply go straight to the soap and water. (Many make -up sponge brands sell their own cleaning agents, but baby shampoo is just as good.)
Dive the sponge and massage it with your hands, press it around until you get out make -up into the water. If it is really, very dirty, let it sit in this soapy water for about 10 minutes. Take it out and put some soap directly on the wet sponge and work it in a foam. Guide the sponge under a tap to rinse it and do not stop until the water is clear.
To dry the sponge, support it when you can and let it dry. It can air flat, but you want to turn it over a few times. Let it dry overnight to make sure that there are no damp spots deep inside that could become mold. If you think it’s dry, make it good to make sure you feel no moisture. Don’t put it back in the drawer or your container until it is completely dry.